 Pin
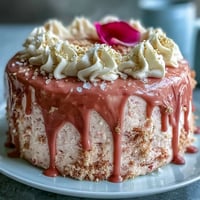
Pin The first time I decided to bake a Rosé Velvet Cake was on a whim after getting distracted by a sparkling bottle of rosé at the market. There was something a little mischievous about splashing wine into cake batter – a bold swirl of pink felt just right for the spring air that kept appearing and vanishing outside my window. I couldn’t stop glancing at the golden luster dust, daydreaming about how regal it would look dripped over soft pink frosting. It wasn’t a planned celebration, but when the cake came out shining, I realized it was exactly the kind of surprise a bridal shower deserves. That’s how this cake became my signature for toasting milestone moments – rosy, shimmering, and smiling in the sunlight.
I’ll never forget the kitchen filling with laughter and clinking glasses as we decorated one of these cakes for my best friend’s bridal shower. Somebody started singing, someone else flicked berry juice on the counter, and every time I handed off the gold paintbrush, it felt like we were crowning the cake with good wishes. The memory of us leaning over the cake to admire its shimmer is as sweet as the first slice we shared.
Ingredients
- All-purpose flour: Creates a sturdy yet tender crumb – be sure to sift it for a balanced, light texture every time.
- Granulated sugar: Sweetens the batter and helps the cake brown beautifully; I always whisk it in gently to avoid lumps.
- Baking soda: Gives the cake lift without making it taste baking-soda-y – a little goes a long way.
- Fine salt: Enhances the pink velvet’s flavor and balances out the sweetness.
- Cocoa powder (unsweetened): Just a touch for depth; it never competes, only deepens the rosy hue.
- Vegetable oil: Keeps each slice soft and lush; measure carefully for the silkiest crumb.
- Large eggs (room temperature): Bind everything together and make the cake stable; let them warm for best texture.
- Buttermilk (room temperature): Moisture and tang – I love how it tenderizes the crumb with a whisper of acidity.
- Rosé wine: A splash in the batter and buttercream delivers subtle floral notes; pick a dry or sparkling rosé for elegance.
- Vanilla extract: Rounds out the flavors so the cake tastes luxurious and complete.
- White vinegar: Reacts with baking soda for that classic red velvet lift – don’t skip it!
- Pink or rose gel food coloring: Lets you control the blush – go bold or gentle depending on your mood.
- Unsalted butter (room temperature): Essential for fluffy buttercream; beating it well is the secret to an airy finish.
- Powdered sugar (sifted): For smooth, never grainy buttercream – always sift, no matter the mess.
- Heavy cream: Melts into the white chocolate for the perfect drip consistency; don’t overheat or it will seize.
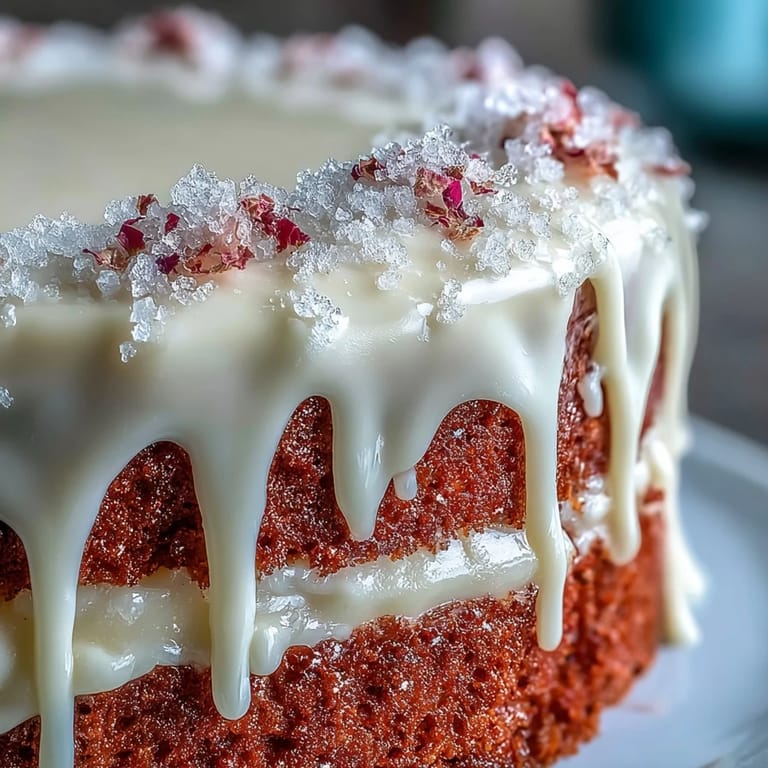
- White chocolate chips: Create a neutral base for the gold drip, so color shines through vibrantly.
- Edible gold luster dust: The cake’s showstopper; pick edible versions only and apply with a clean brush.
- Vodka or clear lemon extract: Mixes with luster dust for a paint that dries fast without dissolving your drip.
- Edible gold accents, rose petals, or berries: Finish for a polished, festive look – optional but unreasonably fun.
- Pinch of salt (for buttercream): A finishing touch that keeps the sweetness balanced and grown-up.
Tired of Takeout? 🥡
Get 10 meals you can make faster than delivery arrives. Seriously.
One email. No spam. Unsubscribe anytime.
Instructions
- Get prepped and set the mood:
- Preheat your oven to 350°F (175°C), line three 8-inch cake pans with parchment, and let the anticipation fill your kitchen with possibility.
- Sift dry ingredients:
- Combine flour, sugar, baking soda, salt, and a blush of cocoa powder, letting the flour drift softly through your fingertips – I always pause to enjoy the powdery whoosh.
- Blend the wet stuff:
- Whisk together oil, eggs, buttermilk, rosé, vanilla, and vinegar; the mixture will smell floral and a little decadent.
- Merge and tint the batter:
- Pour the liquids into the dry bowl and fold until barely combined, then swirl in your favorite shade of pink using gel food coloring.
- Bake your layers:
- Divide batter among pans and bake 30-35 minutes; your kitchen will smell faintly of wine and vanilla, and the tops should spring back with a gentle press.
- Cool to perfection:
- Rest cakes in their pans for 10 minutes, then turn them out onto wire racks to cool until completely cold – patience ensures no melty mishaps later.
- Whip the rosé buttercream:
- Beat butter until it’s cloudlike, then gradually add powdered sugar, finishing with rosé, vanilla, and salt until fluffy and smooth.
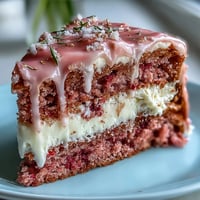
- Layer and frost:
- Level cakes if needed, stack with swirls of buttercream, and coat in a thin crumb layer before chilling for a set finish that makes decorating easier.
- Final coat and chill:
- Apply the last dreamy layer of buttercream and smooth it as you like; chill briefly for the sharpest edges.
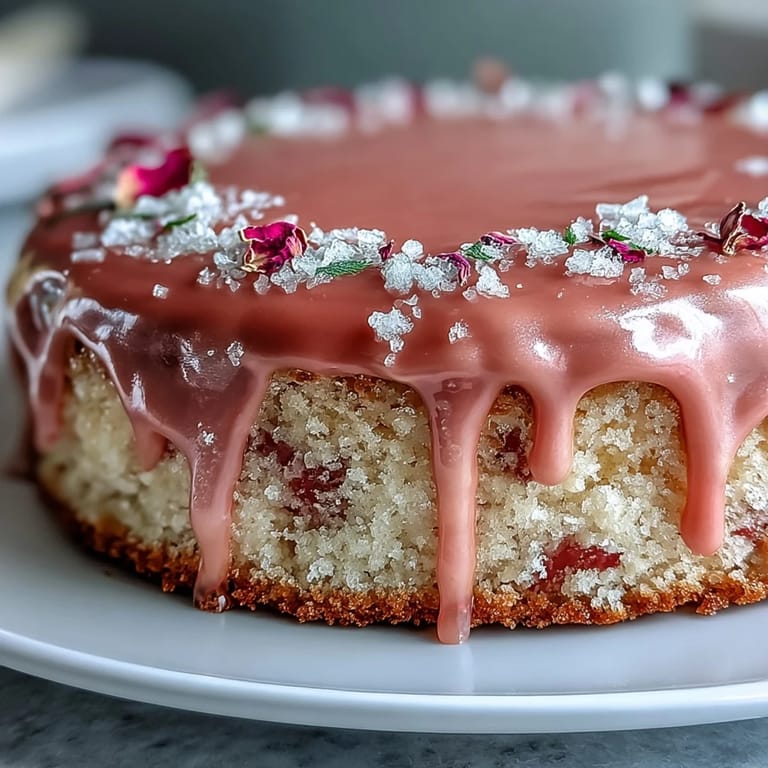
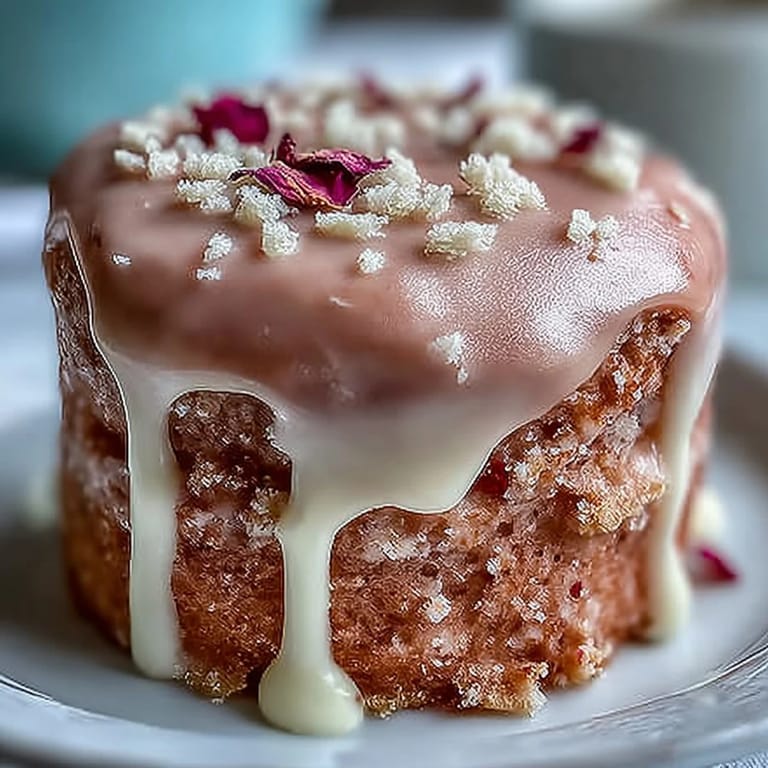
- Create the gold drip:
- Melt white chocolate with cream, let it cool, then cautiously drip it over the cake’s edge using a spoon or squeeze bottle for dramatic golden drips.
- Paint and decorate:
- Mix gold luster dust with vodka for edible paint, brush gently over set drips, and finish with extra rose petals or berries for flair.
 Pin
Pin It wasn’t until guests started snapping photos of the cake instead of each other that I realized what we’d created was more than dessert – it was a centerpiece that seemed to invite celebration itself. When the first piece disappeared and laughter took its place, I knew I’d always bake this cake for life’s sparkliest events.
Getting Your Cake Layers Even
No matter how careful I am, I always seem to underestimate how quickly batter settles in each pan. After a few lopsided attempts, I started using a scale to weigh out the batter into each pan, ensuring every bite is equal and the cake stacks up beautifully. If you ever find wonky layers, a bread knife and honest humility will get things back on track in no time.
Troubleshooting the Gold Drip
The first time I tried painting the white chocolate drips, I was too eager and the results were streaky and patchy. Waiting for the drip to set fully is key, and so is using a soft, clean food brush for each stroke. If your chocolate is too hot, it’ll melt down the cake – a simple ten-minute wait makes all the difference.
Decorating Like You Mean It
Having friends around to scatter edible flowers or brush gold accents over the cake turns the decorating into its own little celebration. The cake is already dazzling, but the final touches let your personality shine right along with the gold. Let yourself get a little carried away; every sparkle is a reason to smile.
- Keep extra buttercream handy—mishaps become accents in the right light.
- Use a lazy Susan or turntable for smoother buttercream and effortless gold painting.
- Remember, edible decorations should always be labeled as such; double-check for safety.
 Pin
Pin Each Rosé Velvet Cake brings a little bit of sparkle to any celebration. Wishing you golden slices and laughter at every shower or gathering you make this for.
Recipe FAQs
- → Can I omit or replace the rosé wine?
Yes—substitute an equal amount of apple juice, white grape juice plus a splash of lemon, or a nonalcoholic rosé for flavor balance. Keep liquid volume the same and adjust sweetness if needed.
- → How do I keep the cake layers moist?
Use room-temperature ingredients, avoid overmixing, and watch baking time closely. The oil and buttermilk in the batter help retain moisture—remove layers from pans after 10 minutes and cool on a rack to finish gently.
- → How is the edible gold drip made safe?
Make the drip from melted white chocolate and cream, cooled slightly before using. Mix edible luster dust with a food-safe clear spirit or clear extract to paint the set drip. Only use luster dust labeled food-grade.
- → Best way to get a smooth buttercream finish?
Apply a thin crumb coat and chill for 20–30 minutes, then spread the final layer with an offset spatula while rotating the cake. A hot spatula smoothed with brief strokes can refine the surface.
- → Can this be made ahead and how should it be stored?
Yes. Assemble and chill overnight for best flavor. Store covered in the refrigerator; bring to room temperature before serving. Layers can be wrapped and frozen for longer storage—thaw in the fridge before assembling.
- → Should I use sparkling or still rosé?
Either works: sparkling rosé adds light effervescence and extra brightness, while a dry still rosé gives a subtle floral fruit note. Choose based on desired intensity and aroma.